
21 May 2021
Remarkable Encryption - From Threat Model to Final Implementation
In the process of going paperless, we recently acquired multiple reMarkable 2
epaper tablets. Among other things, the tablets will be used for taking notes
about engagements. These data are highly sensitive and must be well protected.
Unfortunately, by default the reMarkable offers little protection against
attackers with physical access. We therefore opted to add a layer of encryption
to our tablets. In this blog post we outline our journey from threat modeling to
a secure, reliable and user-friendly implementation using gocryptfs, C++, Qt
and systemd. The final result has been released on
GitHub.
Step 1: Threat Modeling
A good first step in the development of security features is to work out the threat model. After recognizing which threats we want or can protect us against we can use this knowledge to evaluate the technologies that we build upon. These are our high-level thoughts that resulted from our threat modeling:
- If our devices leave our specially protected offices, they have to be attended by an employee at all times.
- We need to protect the data on the devices at all cost if devices are (maybe forcefully) stolen. Thus, it is necessary to be able to encrypt the data for example during travels to our customers. The devices are only decrypted and used when a sufficiently controlled environment is established.
- If a device is stolen and found or returned or even after a device is left unattended outside our protected offices, the device will not be used again. No attempts to decrypt the data on that device will be made. This is necessary to protect against evil maid attacks. This is an extremely interesting and very critical topic in threat modeling and probably warrants an own blog post.
- We have no intentions to use reMarkable cloud.
As a result, we don’t need to protect the device configuration and programs on the device. If there is a chance that attackers could have accessed the device, our security requirements demand that the device cannot be used any more. Therefore, we don’t have to worry about modifications of the software or changes of the devices hardware. Only the data itself needs to be encrypted.
Keep in mind that our solution might not fit your needs if your threat model differs from ours.
Step 2: What Are We Dealing With?
Now we take a look at the setup that is already present on the reMarkable 2 out
of the box with the firmware version 2.6.2.75. To deploy applications, the
tablet can be connected via USB, offering a virtual network interface which
exposes the device’s Dropbear SSH server. After logging in we can inspect the
environment as the root user:
reMarkable: ~/ uname -a
Linux reMarkable 4.14.78 #1 SMP PREEMPT Tue Feb 23 20:05:57 UTC 2021 armv7l GNU/Linux
The reMarkable 2 uses a 32-bit ARMv7 CPU. If the kernel is configured to
support FUSE
file systems, this could be used to mount an encrypted volume. We can test this
by taking a look at the kernel build configuration:
reMarkable: ~/ zcat /proc/config.gz | grep -i fuse
CONFIG_FUSE_FS=y
Now we know that we can use FUSE-based encryption solutions such as
gocryptfs. gocryptfs is written in
Go, which means that it can be easily cross-compiled for
the ARMv7 CPU. The cryptography that is employed is well
documented and a
security audit as been performed on
it. After the audit, a detailed threat
model was created and multiple
issues were addressed (as documented in within the threat model document).
Our own threat model only requires that attackers with access to the encrypted files cannot gain information about the plain text file contents and names. As discussed earlier, we rule out other attacker types by refusing to trust or use devices that were unattended outside our protected offices. Regarding our attacker model the security audit claims the following:
We found that gocryptfs provides excellent confidentiality against a passive adversary, i.e. one that does not tamper with the encrypted files.
Thus, we decided to base our encryption solution on gocryptfs.
Step 3: Setting Up the Encrypted Volume
Now we want to prove that such a solution works and does not interfere in
undesired ways with the official reMarkable software xochitl. But first, we
need to identify the actual data we want to protect. The actual data managed by
xochitl including documents and metadata is stored in the following folder
(the reMarkable file system layout is documented
here):
/home/root/.local/share/remarkable/xochitl/
However, as root’s home directory /home/root also contains logs and cache
directories, we decided to play it safe and encrypt it entirely. For our
encryption setup, we constructed the following directory structure:
/home
└── crypto
    ├── bin (binaries needed for our crypto setup)
    ├── fs  (the encrypted file system that will be mounted to /home/root)
    └── lib (shared libraries for our crypto setup)
Next, we compile gocryptfs for the reMarkable 2. We opted to use gocryptfs
with Go’s AES-GCM implementation instead of the OpenSSL implementation for
easier cross-compilation:
$ git clone github.com/rfjakob/gocryptfs
$ cd gocryptfs
$ git checkout tags/v1.8.0
$ GOARCH=arm CGO_ENABLED=0 go build -tags without_openssl
$ scp gocryptfs remarkable2:/home/crypto/bin/
To be able to mount the decrypted file system using FUSE, gocryptfs relies on
the fusermount binary. However, this binary is not present on the reMarkable
tablet. Eventually we found out that the fusermount binary from the Debian
fuse package for the armhf architecture also works. It is placed alongside
gocryptfs in the binary folder of our crypto setup:
$ wget https://ftp.halifax.rwth-aachen.de/debian/pool/main/f/fuse/fuse_2.9.9-1+deb10u1_armhf.deb
$ sha256sum fuse_2.9.9-1+deb10u1_armhf.deb # for comparison
610b19c800bd7624b19b34de8eb2030c4596a64b2ce6f9efe074d844e3fb798b  fuse_2.9.9-1+deb10u1_armhf.deb
$ dpkg -x fuse_2.9.9-1+deb10u1_armhf.deb fuse
$ scp fuse/bin/fusermount remarkable2:/home/crypto/bin/
Afterwards, we can create the encrypted volume:
reMarkable: ~/ /home/crypto/bin/gocryptfs -init /home/crypto/fs
Now we can try out this setup by stopping xochitl, mounting the decrypted
volume at /home/root. When xochitl is started again, it will setup the home
directory again (in the process a new root user password will be chosen).
reMarkable: / systemctl stop xochitl
reMarkable: / PATH=/home/crypto/bin gocryptfs -nonempty /home/crypto/fs /home/root
reMarkable: / systemctl start xochitl
After completing the device setup, we confirm that everything works fine. Now
all documents are stored encrypted in /home/crypto/fs. Finally, we stop
xochitl again and unmount the crypto volume for now:
reMarkable: / systemctl stop xochitl
reMarkable: / /home/crypto/bin/fusermount -uz /home/root
Step 4: Designing a Robust and Reliable Solution
While we proved that an encryption solution based on gocryptfs is possible,
the current state is hardly a production-ready solution. We decided to build a
daemon that manages the decryption (mounting) and unmounting process. The daemon
should not only make this solution easy to use but it should also be reliable
and fail-safe.
As a consequence, the daemon will also manage the execution of xochitl. For
fail-safety it is important to correctly handle situations in which the mount
process dies. Independent of the actual implementation inside xochitl, it
should always be impossible to accidentally write documents directly in the
actual file system of the reMarkable without encryption. This can be prevented
by configuring the home directory to be read-only before mounting the decrypted
volume with gocryptfs. While this prevents accidental writes, it is not clear
how xochitl or future iterations of xochitl react to not being able to write
into the home directory. In any case, a stable and resilient solution would be
preferable, one where the device restores a proper state on its own.
We designed the following flow graph for the daemon:
- Ask for the passphrase: We’ll need a custom GUI application for this.
- Mount the encrypted filesystem If mounting fails due to an incorrect password, go back to 1.
- Start
xochitl - Wait until either:
- The mount process dies: If the mount process dies,
xochitlis immediately killed and the daemon continues at 2. xochitldies: Ifxochitldies, it is immediately restarted and the daemon continues at 4.
- The mount process dies: If the mount process dies,
Additionally, the actual /home/root directory can now be configured read-only
as an additional security mechanism. Nonetheless, using this simple algorithm,
the daemon should autonomously recover gracefully if the mount process dies.
In the next sections of the blog post, we will outline some considerations, issues and solutions of the actual implementation of the daemon and the accompanying programs such as the passphrase prompt. The complete implementation is available at https://github.com/RedTeamPentesting/remarkable-encryption.
Developing The Passphrase Prompt
Before we can decrypt our data, we need a way to enter the passphrase. Ideally,
this should be possible on the device itself and not for example via network
over USB. In order to be able to compile graphical applications in Qt for the
reMarkable, a suitable toolchain has to be installed. Unfortunately, the
official toolchain is not compatible with the current reMarkable firmware
2.6.2.75 anymore and it is unclear if an updated official toolchain will be
released at all. Therefore, the toltec v2.x
toolchain was used. However,
since this solutions contains both Go and C++/Qt applications, a custom
Dockerfile based on the ghcr.io/toltec-dev/golang and
ghcr.io/toltec-dev/qt docker images was used to cover all components.
Accessing the Framebuffer
Unfortunately, Qt applications built with this toolchain only work out-of-the-box on the reMarkable 1. On the reMarkable 2, these applications cannot correctly address the framebuffer. This issue was addressed by the open-source community via the remarkable2-framebuffer project. Following the build instructions (using the aforementioned SDK version) of the project, the following shared objects are created:
librm2fb_server.so.1.0.0librm2fb_client.so.1.0.0
We place these files in the lib folder of our crypto setup with the version
number removed. These are meant to be used together with the LD_PRELOAD
mechanism. According to remarkable2-framebuffer’s
README.md,
the server component of the framebuffer can be executed by running
/usr/bin/xochitl with the server shared object preloaded (this does not
actually start
xochitl).
For our purposes, we placed a shell script in the bin folder of our crypto
setup:
/home/crypto/bin/rm2fb_server:
#!/bin/bash
LD_PRELOAD=/home/crypto/lib/librm2fb_server.so /usr/bin/xochitl
To start the framebuffer server automatically after startup we added a systemd
unit:
/etc/systemd/system/framebufferserver.service:
[Unit]
Description=Framebuffer Server
After=home.mount

[Service]
ExecStart=/home/crypto/bin/rm2fb_server
Restart=on-failure
ExecStartPost=/bin/sleep 1

[Install]
WantedBy=multi-user.target
We added a second of delay via ExecStartPost to make sure that the frameserver
is fully functional before other units that depend on this unit are executed.
The unit can be loaded and enabled as follows:
reMarkable: ~/ systemctl daemon-reload
reMarkable: ~/ systemctl enable framebufferserver
Now we can run GUI programs built with the toolchain by preloading the client shared object library. This means that we preface the calls of programs as follows:
reMarkable: ~/ LD_PRELOAD=/home/crypto/lib/librm2fb_client.so ./myprogram
Adventures into Qt and QML
The passphrase prompt is implemented in the Qt Modeling Language
(QML). In order to
setup the environment correctly for the reMarkable, we loosely based the
project on the example project
reHackable-HelloWorld.
The majority of the application is developed in QML. A C++ stub simply loads
and runs the .qml files. These files are embedded during compilation,
resulting in a single binary. To make Qt play nice with the epaper display, a
few variables have to be set in main.cpp as well as a few options in the
.pro file which are documented in the reHackable-HelloWorld example.
In our case, the QML program is executed within our C++ stub. Afterwards, the
content of the passphrase prompt text field is extracted from the QML engine and
printed to stdout. The daemon can later execute the passphrase prompt
application and read the password from stdout of the process.
Within QML, the passphrase box looks as follows:
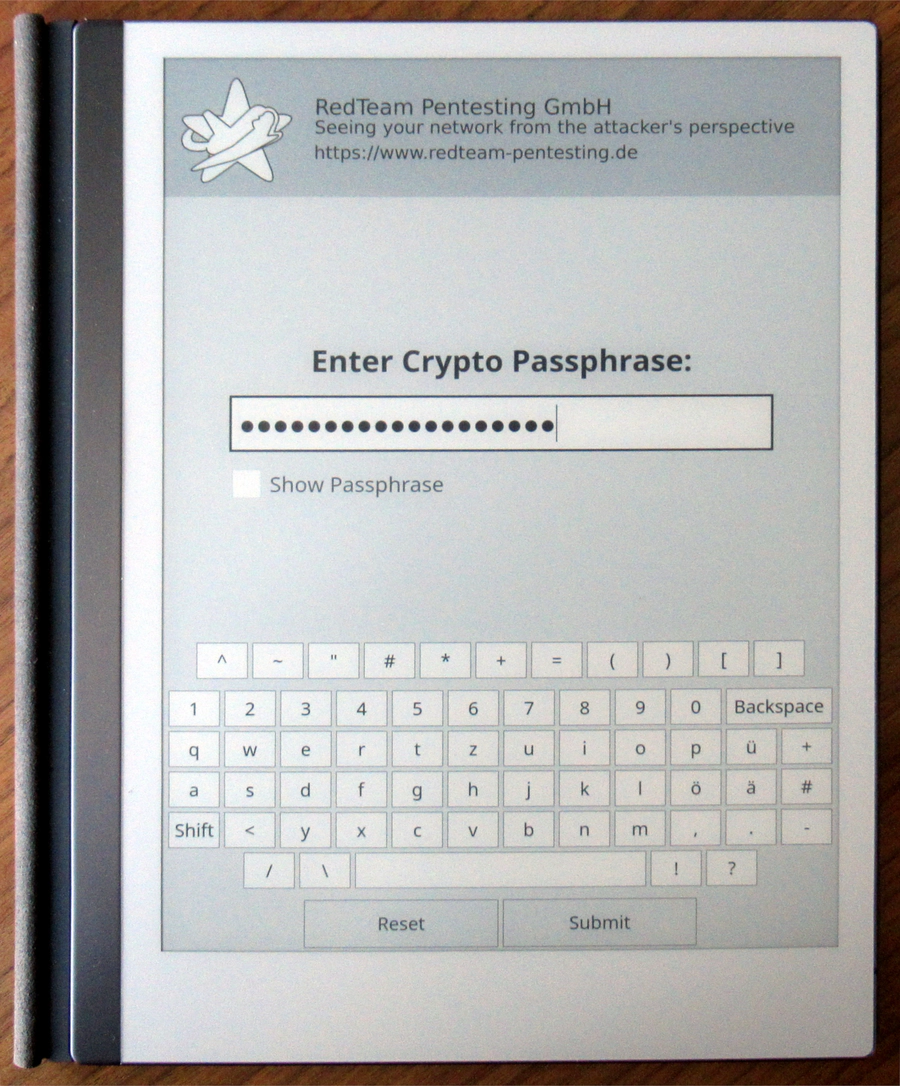
TextInput {
    objectName: "passphraseField"
    id: passphraseField

    focus: false
    width: parent.width - 40
    cursorVisible: true
    activeFocusOnPress: false
    autoScroll: true
    echoMode: passwordVisible.checked? TextInput.Normal : TextInput.Password
    wrapMode: TextInput.Wrap
    anchors.centerIn: parent
    font.pointSize: 18
}
The objectName property allows us to address this TextInput element within
the C++ code using the findChild method:
auto rootObjects = engine.rootObjects();
if (rootObjects.length() != 1) {
    std::cerr << "unexpected number of root objects: " << rootObjects.length() << std::endl;

    return -1;
}

auto passphraseInput = rootObjects.first()->findChild<QObject*>("passphraseField");
if (passphraseInput == NULL) {
    std::cerr << "cannot find password field" << std::endl;

    return -1;
}
After executing the QML program, we can obtain and print out the current value of the password prompt as follows:
std::cout << passphraseInput->property("text").toString().toStdString() << std::endl;
For the keyboard, we just added a bunch of MouseArea elements. We also tried
using the TapHandler where we can explicitly add PointerDevice.Stylus to the
acceptedDevices property. However, we were not able to get the stylus to work
at all. We would be very happy to receive some tips to get the stylus working
from those that are more experienced with Qt and the reMarkable hardware.
While working with the epaper display, it became quite obvious that fast
consecutive drawing operations may be batched together which can cause delays
and a bad user experience. Therefore, visual changes are used sparingly. For
example, we refrained from using visual feedback on pressed keys and opted for a
non-blinking cursor in the passphrase field (see the properties focus and
activeFocusOnPress of the passphrase text input element).
The final passphrase prompt application looks like this:
Sometimes when our passphrase prompt program quits, the screen is left in a
weird state. This results in xochitl starting with inverted colors until the
first full screen redraw. We suspect this behaviour is caused by switching from
a program using remarkable2-framebuffer to the official framebuffer
implementation and/or from the QML program quitting before the screen can react
to the final drawing events.
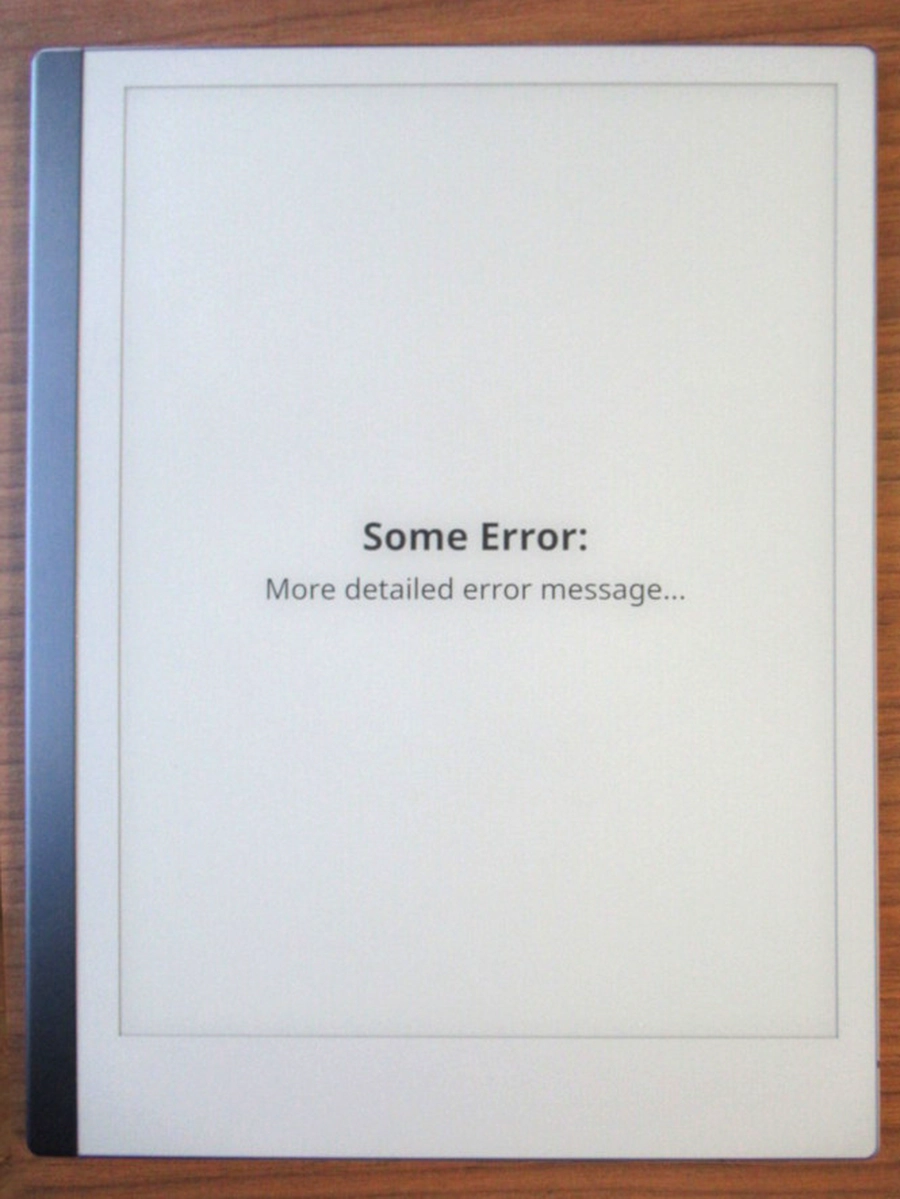
We created another similar C++/QML program that prints arbitrary text received
via command-line arguments to the screen in order to show error messages from
the daemon to the user. We found that this program is also very useful when no
arguments are provided. In this case, the screen is cleared. When implementing
this with timers, we found that we could avoid the issue where xochitl would
start with inverted colors. We gave this program the plain name print. Here is
an example error message as rendered by our print program:
Rectangle {
    id: background
    anchors.centerIn: parent
    color: "black"
    height: parent.height
    width: parent.width
}

[...]

Timer {
    interval: 150; running: true; repeat: false
    onTriggered: {
        background.color = "white"
        shutdownTimer.start()
    }
}

Timer {
    id: shutdownTimer
    interval: 150; running: false; repeat: false
    onTriggered: {
        Qt.callLater(Qt.quit)
    }
}
The program starts with a black full screen rectangle. The first timer
immediately starts (running: true) and changes the background color to white
after 150 milliseconds. This also reveals any text that may have been provided.
As soon as this happens, the shutdown timer is started which quits the program
after 150 seconds. These timers guarantee that the screen has enough time to
process these changes. The change from black to white of the full screen
guarantees a full screen redraw. Even for the purpose of displaying text, it is
perfectly fine to quit after the text is displayed because the epaper display
will retain the text until another program draws on it again.
As we had little prior experience with QML and epaper displays, we have no idea if there are more elegant solutions to such problems. Again, we are happy to hear from you if you have any suggestions.
The Cryptodaemon
At this point, we have all the necessary tools but still lack the glue. This
glue was previously referred to as the daemon. This daemon was implemented in Go
and it was given the name cryptodaemon. It is meant to be started as a
systemd service after the device boots instead of the original xochitl
systemd unit. To refresh your memory, the cryptodaemon mounts the decrypted
file system and starts xochtil. From then on, the data is available in
unencrypted form until the device is powered off.
Here’s the systemd unit file for the cryptodaemon
/etc/systemd/system/cryptodaemon.service:
[Unit]
Description=Cryptodaemon
Requires=framebufferserver.service

[Service]
ExecStart=/home/crypto/bin/cryptodaemon
Restart=on-failure
# allow cleanup by new subprocesses after SIGTERM
KillMode=mixed

[Install]
WantedBy=multi-user.target
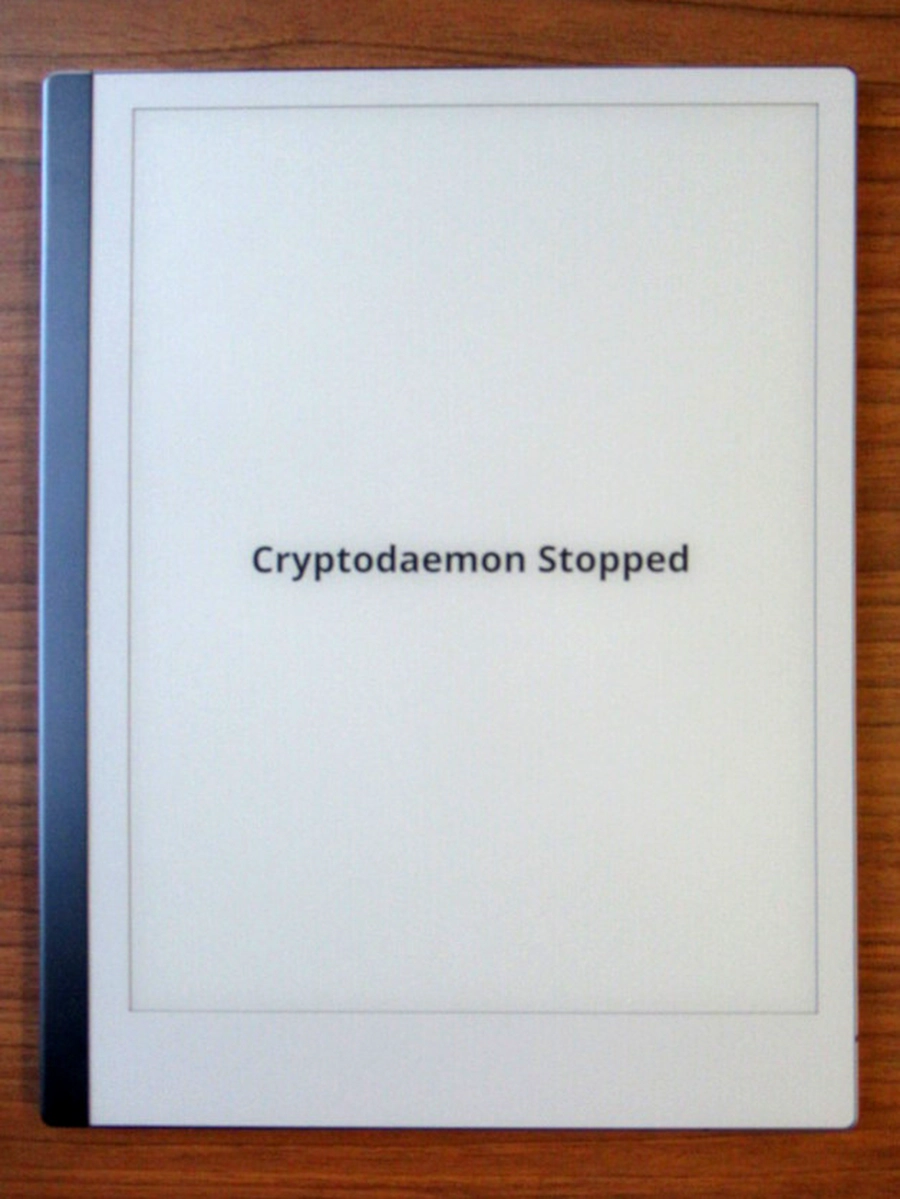
We declared that the cryptodaemon requires the framebufferserver service we
discussed earlier. This ensures that we can always run our Qt-based applications
even when the framebufferserver was not started beforehand. We also specified
KillMode=mixed. This allows us to start new processes even after the systemd
unit is stopped. We use this to call the print program to write “Cryptodaemon
Stopped” to the screen before exiting to make it obvious to the user that
nothing is currently running. Otherwise, the display may keep showing the last
frozen state of the xochitl application leaving the user wondering why the
buttons don’t work. Instead, the user sees this:
Now we can take a look at the steps we took to implement the flow graph shown earlier:
After starting the cryptodaemon, the passphrase prompt application is started.
It is necessary that LD_PRELOAD=/home/crypto/lib/librm2fb_client.so.1.0.0 is
added to the environment variables beforehand such that the application can
correctly address the framebuffer. After the passphrase has been entered it is
read by the cryptodaemon from stdout of the passphrase prompt application.
Subsequently, we use print without any arguments to force a full screen redraw
to put the screen into a more reliable state to later start xochitl. Before
that, however, we need to mount the crypto volume using gocryptfs. This part
is a bit tricky to get right in a reliable way. We both need to detect pre-mount
errors (such as an incorrect passphrase), and later errors that break the mount
(for example if gocryptfs crashes for some reason). In between those cases,
the mount will become available and we need to detect that too as this is our
cue to start xochitl. Fortunately, gocryptfs has us covered and provides an
option to send a SIGUSR1 signal as soon as the mount is available.
var stdErr bytes.Buffer

gocryptfsCMD := exec.Command("/home/crypto/bin/gocryptfs", "-fg", "-nonempty",
    fmt.Sprintf("-notifypid=%d", os.Getpid()), cryptoFS, mountPoint)
gocryptfsCMD.Stderr = &stdErr
gocryptfsCMD.Stdin = strings.NewReader(passphrase + "\n")
We use the -fg option to be able to keep a handle of the gocryptfs process
that provides the mount. By observing this process we can detect a crash and
thus handle situations where the mount stops being available. With -notifypid
we request the SIGUSR1 signal to be sent to the PID of the cryptodaemon. The
stderr stream is captured so we can better analyse any errors. Finally, we
provide the passphrase via stdin and flush it with a newline. We allocate two
channels to be able to detect when the
process terminates or when SIGUSR1 is received.
terminated = make(chan error, 1)
ready := make(chan os.Signal, 1)

signal.Notify(ready, syscall.SIGUSR1)
Now we can start the process and spin up a
Goroutine (similar to an operating
system thread) to monitor for the process and to send a notification to the
terminated channel if the process terminates.
err = gocryptfsCMD.Start()
if err != nil {
    return fmt.Errorf("starting mount: %w", err)
}

go func() {
    err := gocryptfsCMD.Wait()
    if err != nil {
        err = wrapMountError(err, stdErr.String())
    }

    terminated <- err
    close(terminated)
}()
Finally, we wait for signals on both channels:
select {
  case <-ready:
    mounted, err := IsMounted()
    if err != nil {
        _ = gocryptfsCMD.Process.Kill()

        return fmt.Errorf("checking mount status after mounting: %w", err)
    }

    if !mounted {
        _ = gocryptfsCMD.Process.Kill()

        return fmt.Errorf("mount process did not produce a mount at %s", mountPoint)
    }

    return nil
  case err := <-terminated:
    return err
  case <-time.After(defaultMountTimeout):
    err := gocryptfsCMD.Process.Kill()
    if err != nil {
        return fmt.Errorf("kill process after timeout: %w", err)
    }

    return fmt.Errorf("mount timeout exceeded")
}
The first case branch details what happens when we receive the ready event
(SIGUSR1 from gocryptfs). Here we cautiously double check if the mount was
indeed successful (IsMounted checks /proc/mounts) and if so, we can go on
with our next step.
The second case branch is executed when the process terminates before we
receive SIGUSR1. This is most likely the case when the mount cannot be created
due to an incorrect passphrase. In this case we jump back to the beginning and
show the passphrase prompt again. In the case of a totally unexpected error we
can just print that error using our print application.
The last case branch represents situations where the process does not
terminate but also does not send a SIGUSR1 signal within the
defaultMountTimeout of five seconds. In that case we kill the process and print
an error message to the screen. Handling it this way at least ensures that the
user knows what went wrong and the device doesn’t just hang.
Finally, if the mount was successful, we can start xochitl and the user can
actually get some work done. Now the cryptodaemon monitors two processes:
gocryptfs providing the crypto mount and xochitl providing the GUI for the
user. If xochitl dies for some reason, we can just restart it. If gocryptfs
dies, we immediately need to kill xochitl as it should not and cannot write
anything to disk any more anyway (if the permissions are set accordingly for the
actual /home/root folder). Then, we can try to repeat the mount again. Only if
we can get the mount going again, we can restart xochitl. After a few failures
within a short amount of time, we stop the cryptodaemon altogether and display
an error message.
At this point we want to emphasize that neither gocryptfs nor xochtil are in
any way unreliable. However, by covering these unlikely cases, we can achieve a
setup in which the device can recover from a variety of unexpected situations.
This, in turn, results in an overall reliable device for the user and a pleasant
experience.
After a few months of running this setup, we can report that the encryption has no noticeable impact on battery life or performance.
Next Steps
Now we can use the reMarkable 2 like intended with the data protected as soon as the device is powered off. Actually, however, this is not entirely true. To use the reMarkable 2 as intended we still need a way to be able to update the device without destroying our crypto setup. Sure, we could reprovision the device after each update but this is very cumbersome for users.
We already had a solution in place that automatically migrates the setup after
the user applies an upgrade via xochitl. However, the recent 2.6.x upgrade
demonstrated that it is sometimes necessary to recompile the Qt applications
for new firmware versions. As a workaround, an option to unlock the device via
USB network connection was added that can be used when the password prompt
cannot be displayed because it was compiled for an old firmware version. We’ll
continue to work towards a more steamlined upgrade process.
Some Remarks
We would like to thank ddvk for the incredible work with remarkable2-framebuffer. It would be nice if a solution to access the framebuffer or even an up-to-date toolchain would be provided by reMarkable officially. Furthermore, we are also very grateful to rfjakob and contributors for their work on gocryptfs.